
1.3 Your First Trade (Step-by-Step)
Key Takeaways
- You can place your first prediction market trade in under 15 minutes on most platforms — with as little as $5–$10
- The two main onramps are fiat platforms (Kalshi, Robinhood, FanDuel) and crypto platforms (Polymarket, Limitless) — your best choice depends on your location, funding method, and comfort with crypto
- Every trade follows the same lifecycle: find a market → form a view → place an order → wait for resolution → collect or lose
- Use limit orders instead of market orders whenever possible — they save you money on the spread
- Start small. Your first trades are for learning, not earning
Scope: This module is a practical walkthrough — it assumes you’ve read Module 1.1: What Are Prediction Markets? and Module 1.2: How Pricing Works. It covers the how of trading, not the why (that was Module 1.1) or the strategy behind what to trade (that’s Level 3). For help choosing which platform is right for you, see Module 1.5: Choosing Your Platform.
Step 0: Choose Your Path
Before you can place a trade, you need to choose a platform. There are two main paths into prediction markets, and which one you take depends on a few key factors:
Path A: Fiat Platforms (USD / traditional banking)
Best for: U.S. residents, people who want a familiar brokerage experience, anyone who doesn’t already hold crypto.
| Platform | How to Fund | Minimum | Noteworthy |
|---|---|---|---|
| Kalshi | Bank transfer (ACH), debit card, wire | $1 | CFTC-regulated. Widest event selection among fiat platforms |
| Robinhood (event contracts) | Existing Robinhood account balance | $1 | Powers contracts through Kalshi’s backend. If you already have a Robinhood account, you can start in minutes |
| FanDuel Predicts | Existing FanDuel account balance, bank, card | $5 | Routes through ForecastEx. Familiar to sports bettors. 1% fee capped at $5 |
| ForecastEx (Interactive Brokers) | IBKR account balance | Varies | Pays yield on collateral. Best for experienced investors already on IBKR |
The advantage: Familiar interfaces, USD settlement, standard tax reporting infrastructure, no crypto wallet needed.
The tradeoff: Regulatory restrictions limit some market types. Fewer markets than Polymarket. Available primarily in the U.S.
Path B: Crypto Platforms (USDC / stablecoins)
Best for: Global users, crypto-native traders, people who want access to the widest selection of markets.
| Platform | How to Fund | Minimum | Noteworthy |
|---|---|---|---|
| Polymarket | USDC on Polygon network (can deposit via credit card, Apple Pay, or bridge from other chains) | ~$1 | World’s largest prediction market by volume. Global access (except U.S.*) |
| Limitless | USDC on Base network | ~$1 | Decentralized. Dynamic fees (0.03%–3%). Smaller but growing |
*Polymarket officially geoblocks U.S. users due to prior CFTC enforcement. Some U.S. traders use VPNs, but this carries regulatory risk.
The advantage: Broader market selection (politics, geopolitics, culture, crypto, science). Global access. Near-zero trading fees.
The tradeoff: Requires basic crypto knowledge (wallets, stablecoins, bridging). Tax reporting is more complex. Platform risk (smart contract bugs, oracle disputes).
💡 First-timer recommendation: If you’re in the U.S. and have never traded crypto, start with Kalshi. If you’re outside the U.S. or already comfortable with crypto, start with Polymarket. Both are the leaders in their respective categories.
📍 Need more detail? See our full comparison in Module 1.5: Choosing Your Platform and the Platform Directory with in-depth reviews of each platform.
Step 1: Set Up Your Account
The setup process is straightforward on all major platforms. Here’s what to expect:
On Kalshi (Fiat Path)
- Go to kalshi.com and click “Sign Up”
- Enter your email and create a password
- Verify your identity — Kalshi is CFTC-regulated, so you’ll need to provide your full name, date of birth, address, and the last four digits of your SSN. This usually takes 1–3 minutes for automated verification
- Fund your account — Link a bank account via ACH (free, takes 1–3 business days) or use a debit card for instant funding (small fee applies)
- You’re ready to trade — Once your account is funded, you can browse markets and place orders immediately
⏱️ Total setup time: ~5–10 minutes (plus funding delay if using ACH)
On Polymarket (Crypto Path)
- Go to polymarket.com and click “Sign Up”
- Connect or create a wallet — Polymarket supports email login (which creates a custodial wallet for you), or you can connect an existing wallet like MetaMask, Coinbase Wallet, or WalletConnect
- Deposit USDC — You can:
- Buy USDC directly on Polymarket using a credit/debit card or Apple Pay (easiest for beginners)
- Transfer USDC from a crypto exchange (Coinbase, Binance, etc.) to your Polygon wallet address
- Bridge USDC from Ethereum or other networks to Polygon
- You’re ready to trade — Once USDC appears in your balance, you can start
⏱️ Total setup time: ~5–15 minutes depending on funding method
⚠️ Important: Only deposit money you can afford to lose — especially when you’re learning. We recommend starting with $20–$50 as your learning bankroll. Module 1.4: Understanding Risk covers this in detail.
Step 2: Find a Market
Once your account is set up and funded, you’ll land on the platform’s market browser — a list of all available contracts.
How to Browse Markets
On both Kalshi and Polymarket, markets are organized by category:
- Politics — Elections, policy decisions, government actions
- Economics — Fed rate decisions, GDP, inflation, jobs reports
- Crypto — Bitcoin/Ethereum price milestones, protocol events
- Culture / Entertainment — Awards, media, public figures
- Science / Weather — Climate events, space launches, scientific milestones
- Sports — Only available on certain platforms (e.g., FanDuel Predicts)
Choosing Your First Market
For your very first trade, pick a market where:
- You understand the underlying event — Don’t trade a market about semiconductor tariffs if you don’t follow trade policy. Start with something you already know about.
- Resolution is clear and upcoming — Markets resolving within 1–4 weeks are ideal for learning. You’ll see the full trade lifecycle quickly.
- There’s reasonable liquidity — Check the order book. If the bid-ask spread is more than $0.05, there might not be enough participants. Popular markets (elections, crypto prices, Fed decisions) typically have the tightest spreads.
- You have a genuine view — Even though this is a learning trade, practice the core skill: Do you think the implied probability is too high or too low?
💡 Good first trade categories: Federal Reserve interest rate decisions (clear resolution, lots of data), major crypto price milestones (easy to track), or political events you follow closely.
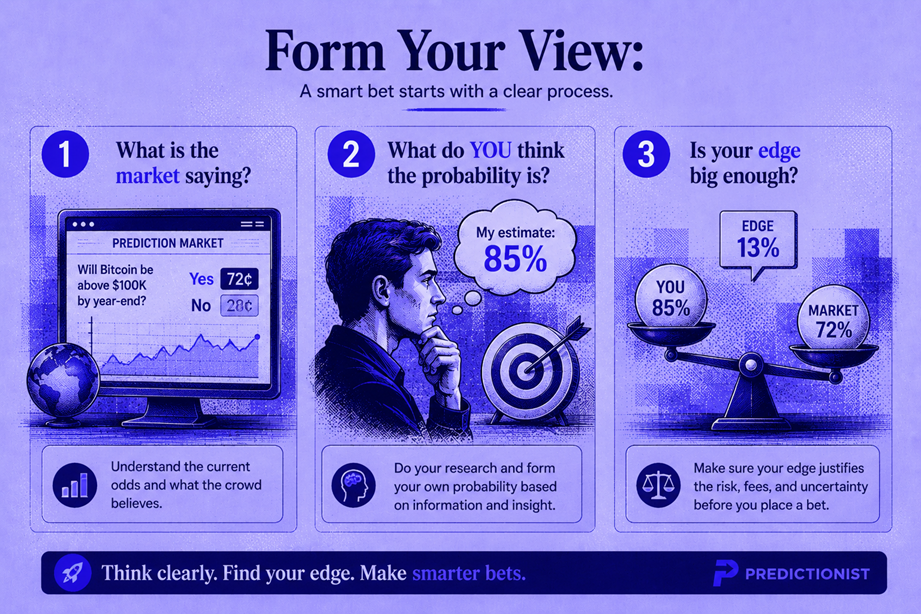
Step 3: Form Your View
Before placing any trade, answer these three questions:
Question 1: What is the market saying?
Look at the current price. If a “Yes” contract is priced at $0.62, the market is saying there’s a 62% probability the event will occur. (Review Module 1.2 if this isn’t intuitive yet.)
Question 2: What do YOU think the probability is?
This is where your independent analysis comes in. For your first trade, you don’t need a sophisticated model — just an honest assessment:
- What do you know about this event that most people might not?
- What data sources have you checked? (News, official statements, historical patterns)
- Are you forming a view based on evidence, or based on what you want to happen? (This is a crucial distinction — see Module 1.4 on emotional trading.)
Question 3: Is the gap between the market’s view and your view large enough to trade?
If the market says 62% and you think 65%, that’s probably not worth trading — the edge is tiny, and fees will eat it.
If the market says 62% and you think 40%, that’s a significant disagreement. You’d want to buy “No” (at $0.38) or sell “Yes.”
Rule of thumb for beginners: Look for at least a 10 percentage point gap between the market price and your estimate before trading. As you gain experience and start accounting for fees precisely, you can lower this threshold.
Step 4: Place Your Order
Now for the actual mechanics. There are two types of orders on most platforms:
Market Order
A market order executes immediately at the best available price. You buy at the current ask price (or sell at the current bid price).
Pros: Instant. You get your position immediately. Cons: You pay the full spread. In thin markets, you may experience slippage (the price moves against you as your order fills large quantities).
Limit Order
A limit order lets you set the maximum price you’re willing to pay (for a buy) or the minimum price you’ll accept (for a sell). Your order sits on the book until someone agrees to trade at your price.
Pros: Better prices. You control exactly what you pay. Cons: Not guaranteed to fill. In fast-moving markets, you might miss the opportunity.
Placing a Trade on Kalshi — Walkthrough
- Find your market — Browse or search for the event you’ve chosen
- Click on the market to open the trading interface
- Choose your side — Click “Yes” or “No” depending on your view
- Select order type — Choose “Market” or “Limit”
- Set your quantity — How many contracts do you want? Each contract is worth up to $1.00 at resolution. Start with a small number (5–20 contracts for a $5–$20 position)
- If using a limit order: Set your price — the maximum you’re willing to pay per contract
- Review the order summary — The platform will show your total cost, maximum potential profit, and maximum potential loss
- Click “Submit” — Your order is placed
Placing a Trade on Polymarket — Walkthrough
- Find your market — Browse categories or use the search bar
- Click on the market to open the trading panel
- Choose “Buy” or “Sell” for either the “Yes” or “No” outcome
- Enter the amount you want to spend (in USDC)
- If using a limit order: Toggle to “Limit” and set your price
- Review the details — Polymarket shows expected payout, number of shares, and the effective price
- Click “Buy” / “Sell” — The trade executes (or sits on the order book if it’s a limit)
💡 Pro tip for your first trade: Use a limit order set 1–2 cents inside the current bid-ask spread. For example, if the bid is $0.55 and the ask is $0.59, place a limit buy at $0.56 or $0.57. This saves you money and teaches you how the order book works. If it doesn’t fill after a few minutes, you can adjust your price.
Step 5: Monitor Your Position
Once your order fills, you have an open position. Now what?
What to Watch
- The current price — Is the market moving toward or against your position?
- News related to the event — New information can significantly shift prices
- Time to resolution — As the resolution date approaches, prices tend to move toward $0.00 or $1.00 as uncertainty decreases
Can You Exit Early?
Yes. You don’t have to hold until resolution. If the price has moved in your favor and you want to lock in a profit, you can sell your contracts before the event resolves.
Example:
- You bought “Yes” at $0.40
- The price has risen to $0.65 after new information shifts the market
- You can sell at $0.65 and pocket $0.25 per contract in profit — without waiting for the event to actually happen
This is one of the key differences between prediction markets and pure gambling: you can trade in and out of positions at any time, just like stocks.
Similarly, if the market moves against you:
- You bought “Yes” at $0.40
- Bad news drops the price to $0.25
- You can sell at $0.25, taking a $0.15 loss per contract — better than risking a total $0.40 loss if the event doesn’t happen
Knowing when to exit — both winning and losing positions — is a skill that develops over time. For your first few trades, consider setting a simple rule: “If my position doubles in value or loses half its value, I’ll reassess.”
Step 6: Resolution — What Happens When the Event Occurs
Every prediction market contract has a resolution date — the point at which the question is answered, and contracts are settled.
How Resolution Works
When the event occurs (or the resolution deadline passes):
- The outcome is determined — Did the event happen? Yes or No?
- The platform (or oracle) officially resolves the market
- On Kalshi: Resolution is based on predefined authoritative sources (e.g., the Associated Press for elections, the Bureau of Labor Statistics for economic data)
- On Polymarket: Resolution uses the UMA Optimistic Oracle. An outcome is proposed, and there’s a two-hour dispute window. If no one disputes, the resolution stands. If disputed, UMA token holders vote on the correct resolution
- Contracts settle:
- If the event happened: “Yes” contracts pay $1.00 each. “No” contracts pay $0.00
- If the event didn’t happen: “No” contracts pay $1.00 each. “Yes” contracts pay $0.00
- Funds are credited to your account — On Kalshi, winnings appear in your USD balance. On Polymarket, USDC is returned to your wallet
How Long Does Resolution Take?
- Kalshi: Usually resolves within hours of the event occurring, sometimes same-day
- Polymarket: The proposal + dispute window takes at least 2 hours. If no dispute: usually resolves within a few hours. If disputed: can take 2–5 days for the UMA vote to conclude
⚠️ Resolution risk is real. We covered this in Module 1.2, but it bears repeating: always read the resolution criteria before trading. The specific wording of “what counts as Yes” can differ from your intuitive understanding. When in doubt, don’t trade that market.
Full Walkthrough: A Trade From Start to Finish
Let’s put it all together with a realistic example.
The Setup
You: A beginner with $50 in your Kalshi account.
The market: “Will the U.S. monthly unemployment rate for April 2026 be above 4.5%?”
Current prices: Yes = $0.30 / No = $0.70
Resolution source: Bureau of Labor Statistics (BLS) Employment Situation Report, scheduled for release on May 2, 2026.
Your Analysis
You check the latest data:
- March 2026 unemployment was 4.3%
- Initial jobless claims have been trending slightly upward
- The consensus economist forecast for April is 4.4%
- Historically, monthly unemployment rarely jumps more than 0.2% in a single month
Your view: A reading above 4.5% is possible but unlikely. You estimate a 20% probability — lower than the market’s 30%.
Your trade: Buy “No” at $0.70.
Placing the Order
- You navigate to the unemployment market on Kalshi
- You click “No”
- You select “Limit order” and set a price of $0.70
- You enter a quantity of 20 contracts (total cost: 20 × $0.70 = $14.00)
- You review: Maximum profit = 20 × $0.30 = $6.00. Maximum loss = $14.00
- You submit the order
- It fills immediately (the current ask for “No” was $0.70)
Waiting
Over the next two weeks, nothing dramatic happens. The contract price fluctuates between $0.65 and $0.72 for “No” as new economic data trickles in. You watch but don’t trade.
Resolution
On May 2, the BLS releases the April jobs report. Unemployment comes in at 4.4% — below the 4.5% threshold.
The market resolves: the event did NOT happen. “No” wins.
Settlement
Your 20 “No” contracts each pay $1.00:
- Revenue: 20 × $1.00 = $20.00
- Cost: 20 × $0.70 = $14.00
- Gross profit: $6.00
- Fees: ~$0.12 (Kalshi fee on winnings)
- Net profit: $5.88
Your Kalshi balance is now $55.88 (original $50 − $14 cost + $20 payout − $0.12 fees).
Congratulations — you’ve completed your first prediction market trade.
Common First-Trade Mistakes to Avoid
Before you jump in, here are the most common errors beginners make:
| Mistake | Why It’s a Problem | What to Do Instead |
|---|---|---|
| Going all-in on one trade | Binary markets can lose 100% of your position. One bad trade shouldn’t wipe out your bankroll | Never risk more than 5–10% of your account on a single trade |
| Chasing “cheap” longshots | Contracts at $0.05 aren’t bargains — they’re priced low because they almost never happen | Think in probabilities, not prices (see Module 1.2) |
| Ignoring fees | Even small fees compound across many trades and can turn a winning strategy into a losing one | Calculate expected value after all fees before every trade |
| Trading on emotion | Betting on your favorite candidate or team because you want them to win is a recipe for losses | Only trade when your analysis suggests the market is wrong, not when your heart does |
| Not reading resolution rules | Ambiguous resolution criteria have caused unexpected losses, even for “correct” predictions | Read the resolution source and criteria for every market before trading |
What You Learned
In this module, you learned:
- Two paths to prediction trading: Fiat platforms (Kalshi, Robinhood, FanDuel) for U.S. users; crypto platforms (Polymarket, Limitless) for global access
- Account setup takes 5–15 minutes on most platforms and requires minimal initial funding
- The trade lifecycle: Find a market → Form a view → Place an order → Monitor → Resolution → Settlement
- Limit orders save money by avoiding the full bid-ask spread
- You can exit early — you don’t have to hold until resolution, which gives you flexibility to lock in profits or cut losses
- Resolution mechanics differ across platforms — from Kalshi’s source-based resolution to Polymarket’s UMA oracle system
- Start small and treat your first trades as tuition, not an investment
What’s Next
Now you know what prediction markets are, how pricing works, and how to place a trade. Before you start trading with real conviction, there’s one more essential module: understanding the risks.
Most retail prediction market traders lose money. Module 1.4 is the most important module in this entire school — it’s where we get brutally honest about the statistics, the psychology, and the real costs of prediction trading.
→ Module 1.4: Understanding Risk — The Honest Truth
🎯 Try This Now: Open an account on Kalshi or Polymarket. Fund it with the minimum amount ($5–$20). Find one market where you have a genuine opinion. Place a limit order for 5–10 contracts. Then just watch. Track the price. See how the market reacts to news. The goal isn’t to profit — it’s to feel how prediction markets work. That tactile experience is worth more than any tutorial.
Predictionist School is a free educational resource from Predictionist.com. We may earn referral commissions from platforms we recommend — see our disclosure policy for details. This content is for educational purposes only and does not constitute financial advice.